Hi Dave here again, i’m back for another update to cover off on what I finished over the last month.
So its been a bit under a month since my first update but I’m happy with my progress so far.
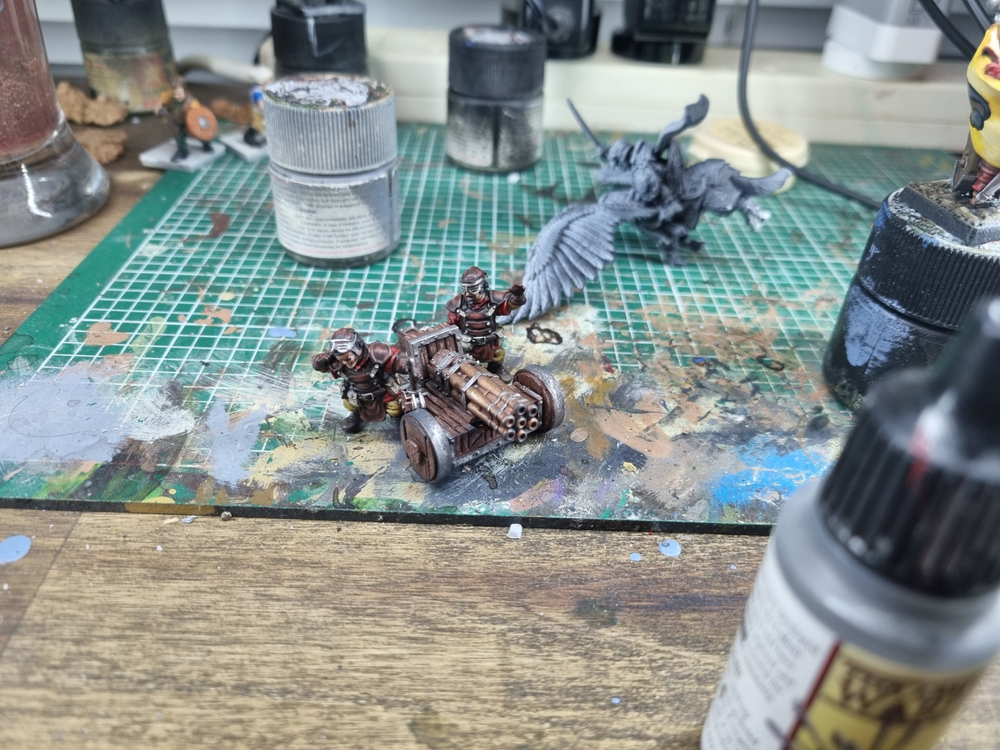
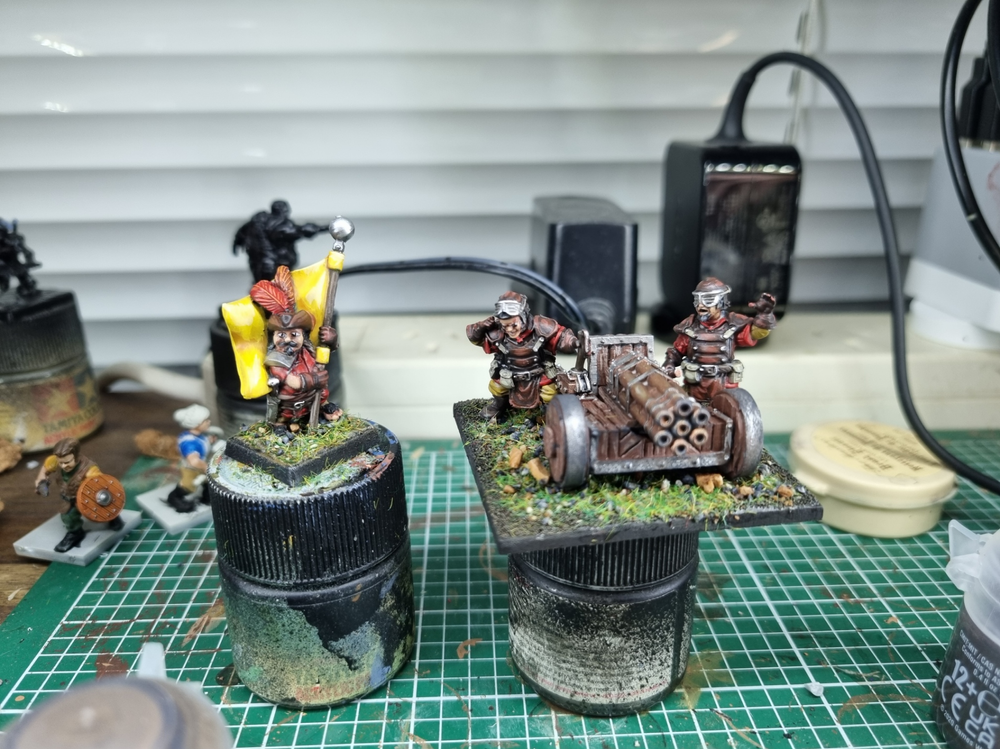
Starting off I managed to complete this war machine team, I magnetized the barrel so I can swap between howitzer and volley gun. (or more likely just never use it)
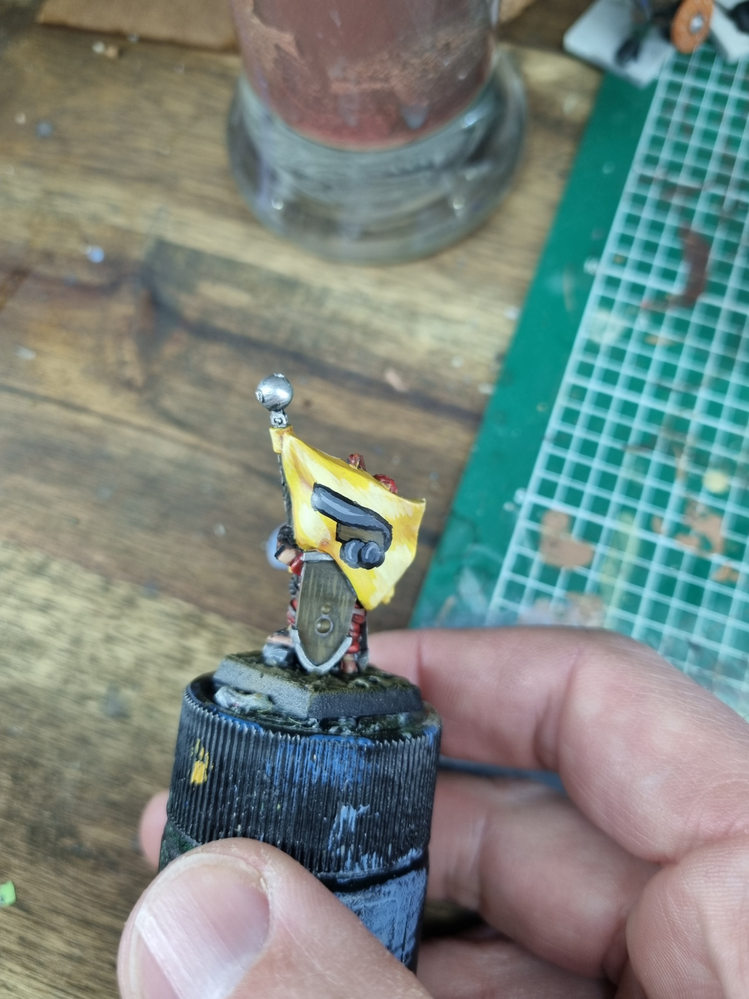
Next up I completed the only non mantic mini I’ll use in my army, the sergeant with the banner of Hodenburg. Hoden in german translates to testicle so I did my best to free hand a sneaky cock and balls on the back. The mini is from TTCombat
For my mounted muster captain on aralez I wanted to mix in a bit of height, maybe too much height…. I was super nervous chopping off the base but it came of relatively easily, I used 2mm brass rod to give it height, and stuck some penny washers in the base under the foam hill for weight. Lastly filled in the base with braves to make it look like the captain is charging over the battle line into combat.
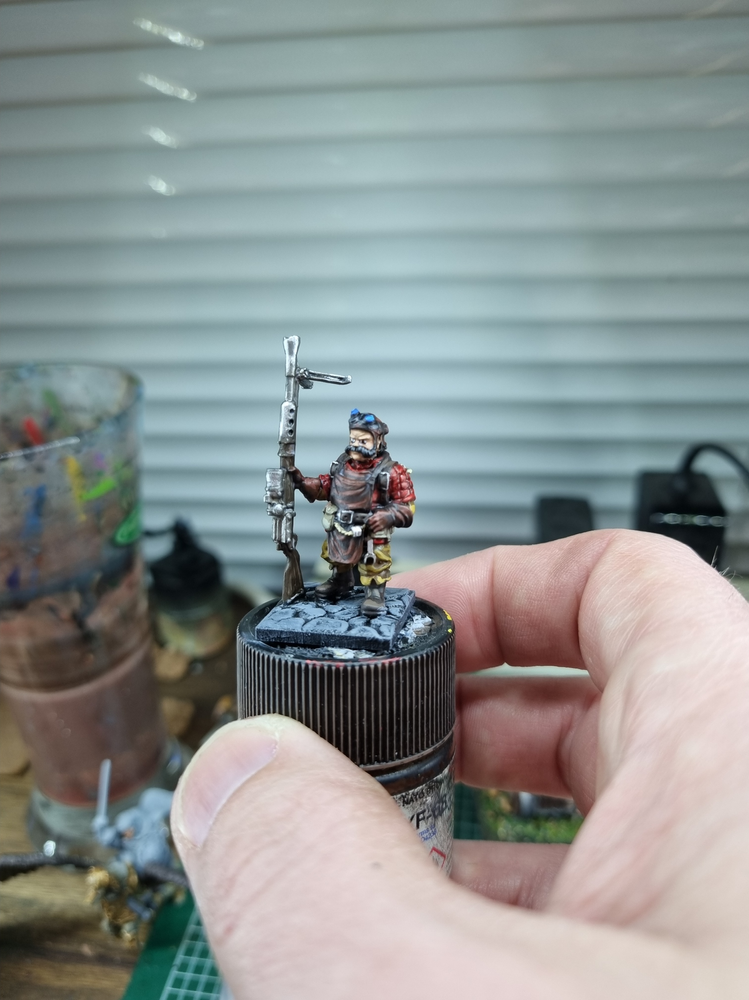
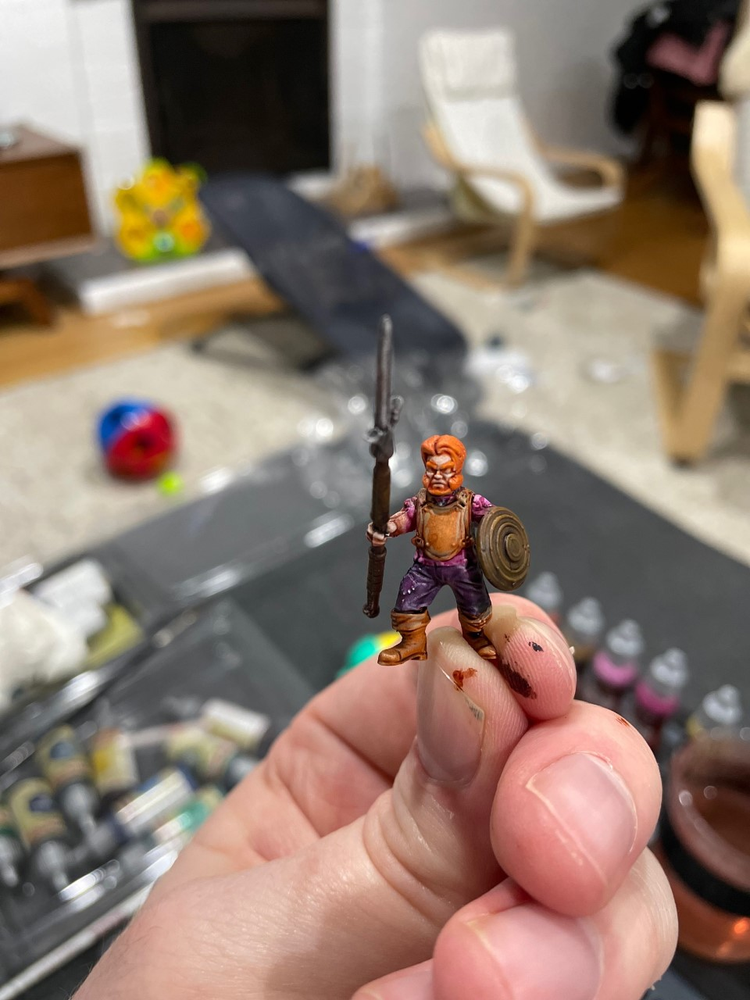
To finish off the month I completed this engineer, it was super quick and super fun to paint.
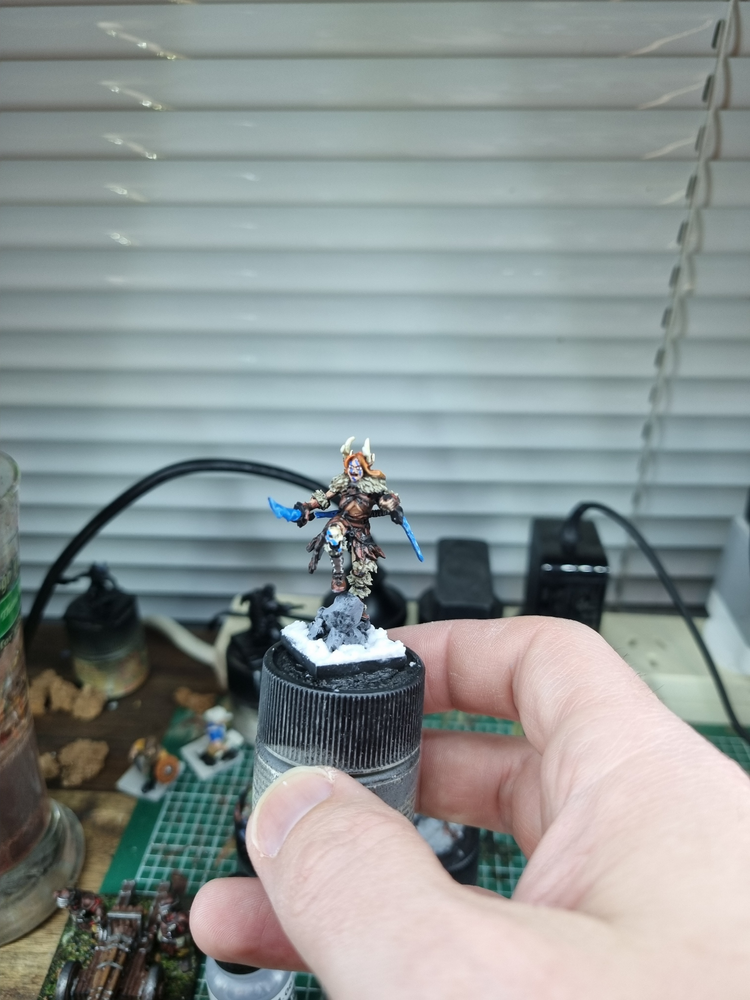
I also snuck in this ice blade for an up coming tournament.
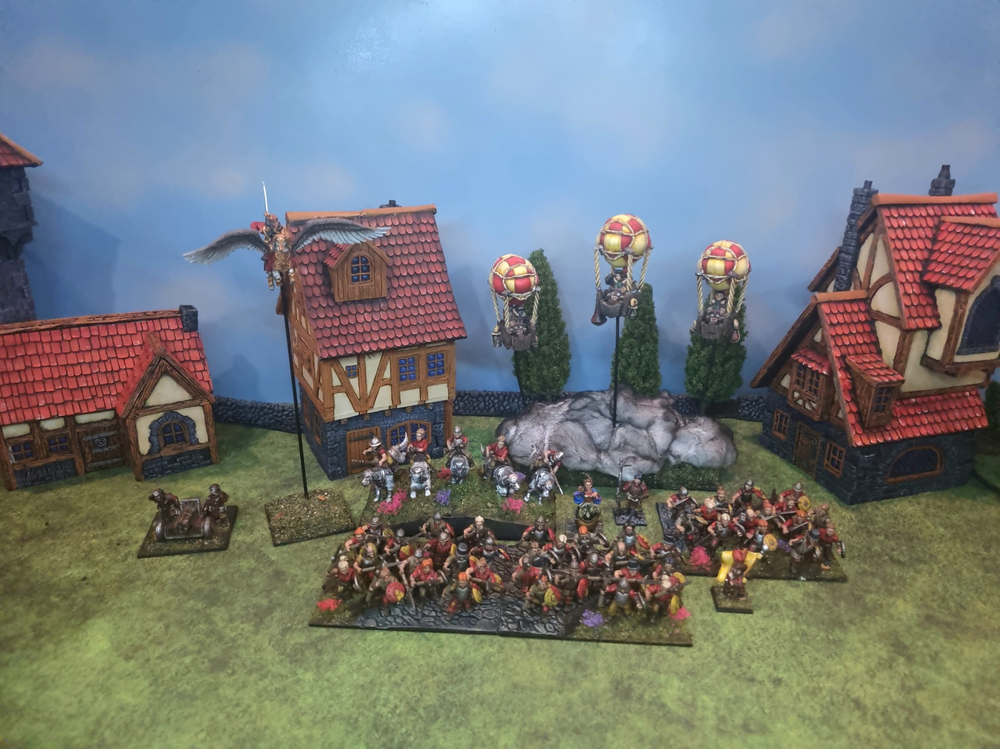
In other unrelated news I finished a backdrop for some scenic photos and recently picked up a battle mat so I decided to set up some scenic photos for my army. Here is what I have finished to date. I’ve gotta get some diffusers or something for better lighting, and also probably use something better then a samsung phone, but I promise the end of army pics will be much better. (please if you have any tips for getting good army shots let me know)
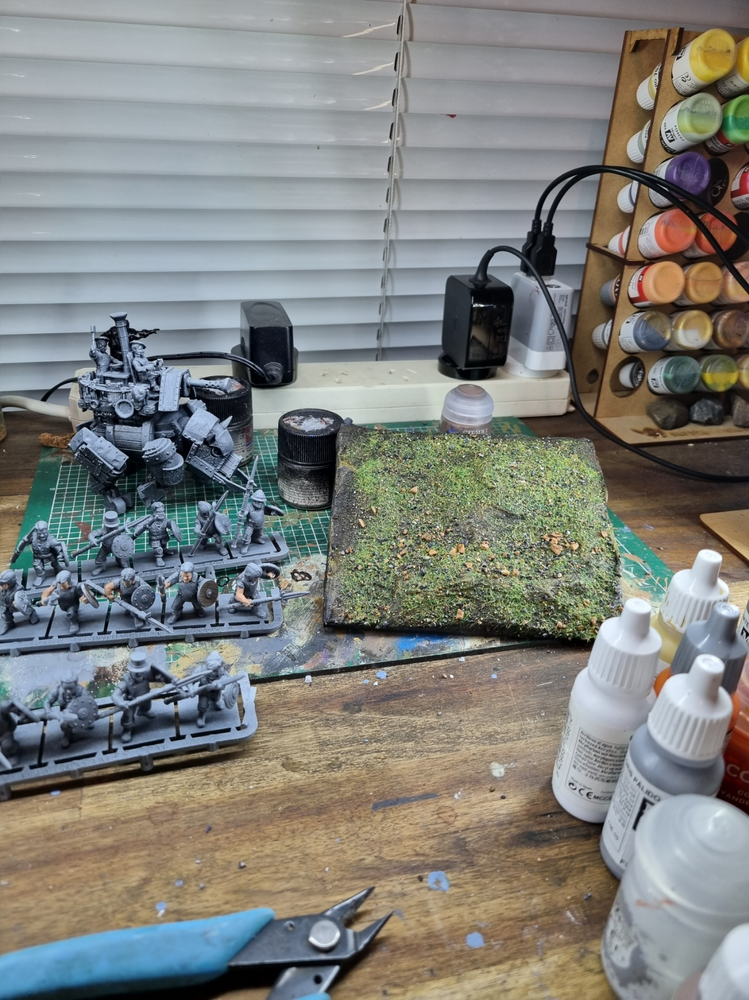
Up next on the paint table its back to the grind of infantry. I’ll finished another regiment of spears, paint the iron beast and then hopefully get a regiment of juggers completed as well. I’ve already made the base for them but it needs some finishing touches once I get the minis stuck on, I’m attempting to make it look like my juggers are charging down the hill into battle.
Like always, if you want to know any paint or materials I use, or just have questions in general, just let me know.
Dave: I kind of threw this together last minute, I like the idea of the helm of the drunken ram on the jugger regiment. They really need more then TC 1, so I hope now they are TC2 it will have a little more impact. 100% I stole the double harvester idea from Matt, they are slow an can be tricky to move around but for 140 pts, 8+d6 hits on 3+ CS1 TC1 I think they are good value. I’ve also got a wild runner troop, and mounted sergeant to support the juggers and intend to keep them together as a battle group.
I’ve got the pride of the shire and a rifle regiment to give me a small fire base to chip on damage while I hold my 4 units of braves back as meat shields.
Matt: I really suck with this style of list at the moment so i plan is to YOLO where I can and just see what I can do. This will highly likely lead to a big loss but I learn better with making mistakes, so by making some big mistakes almost deliberately it should ingrain in me some learning for me better. Basilea I am thinking of taking to a one day tournament mostly because of the effort I have put in to the painting I want to take it rather than taking my dwarfs. So this list does include stuff I already have painted as well.
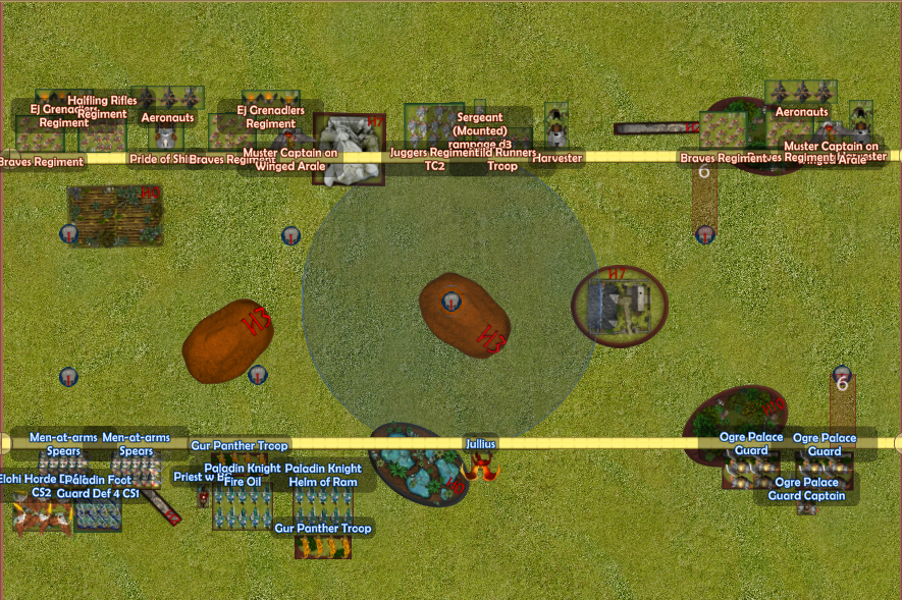
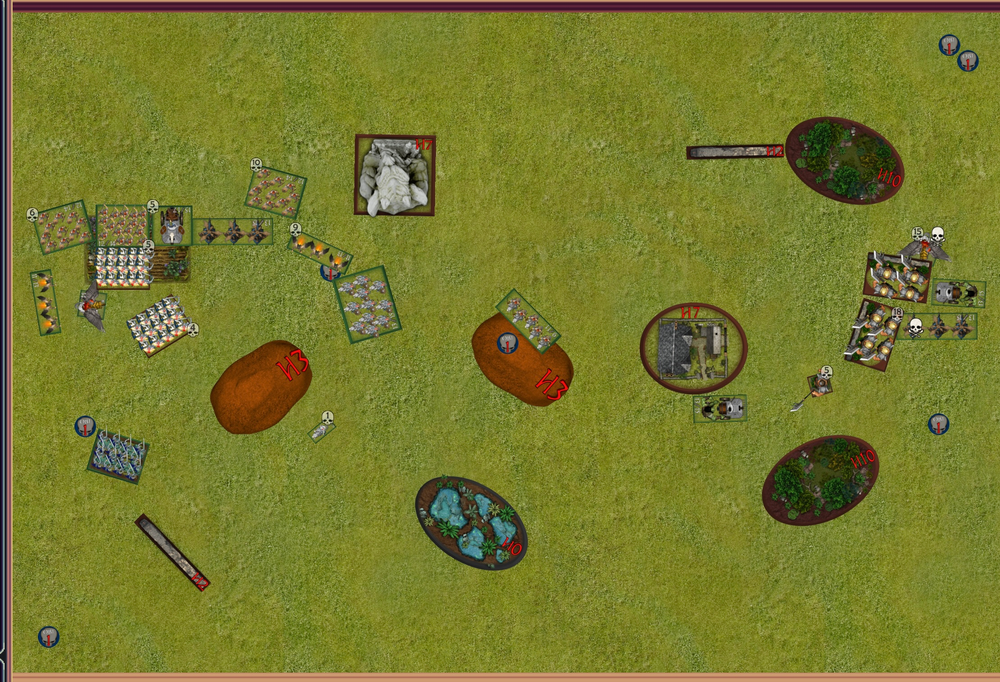
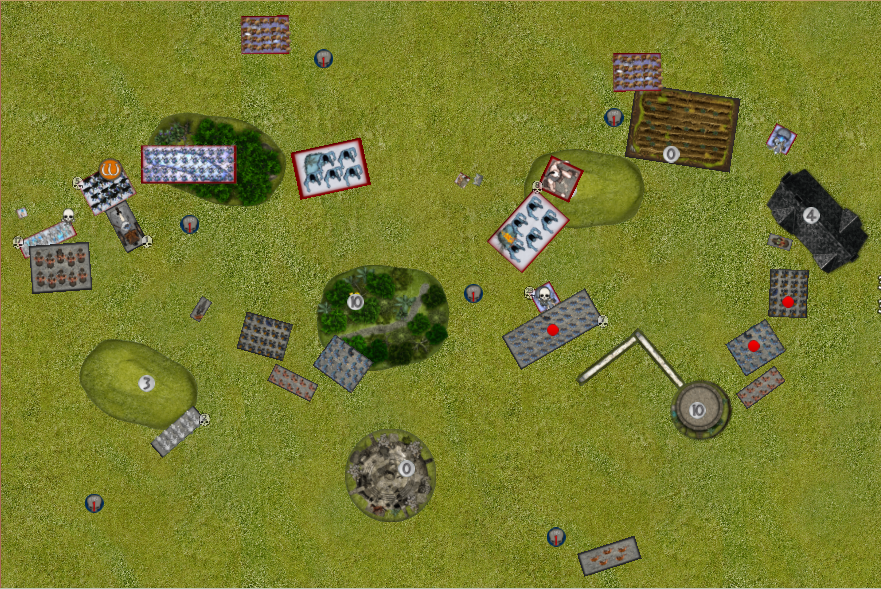
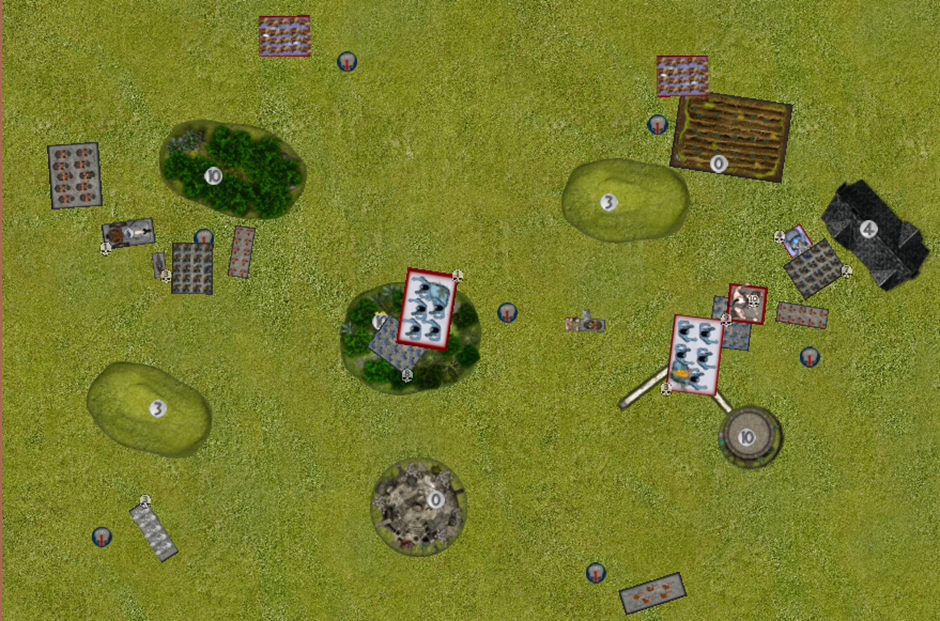
Deployment
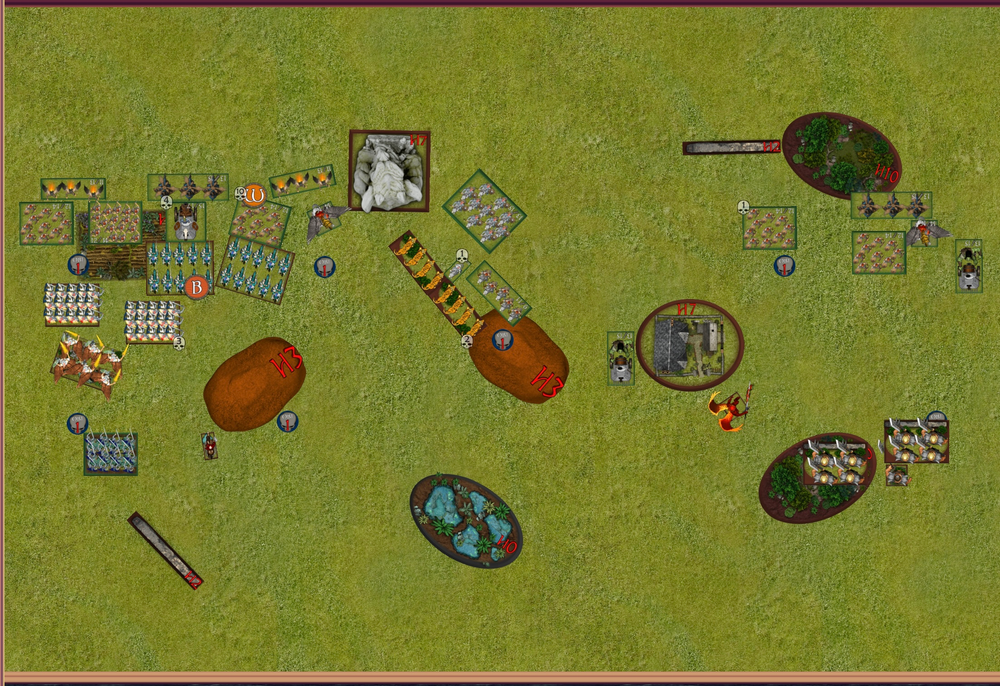
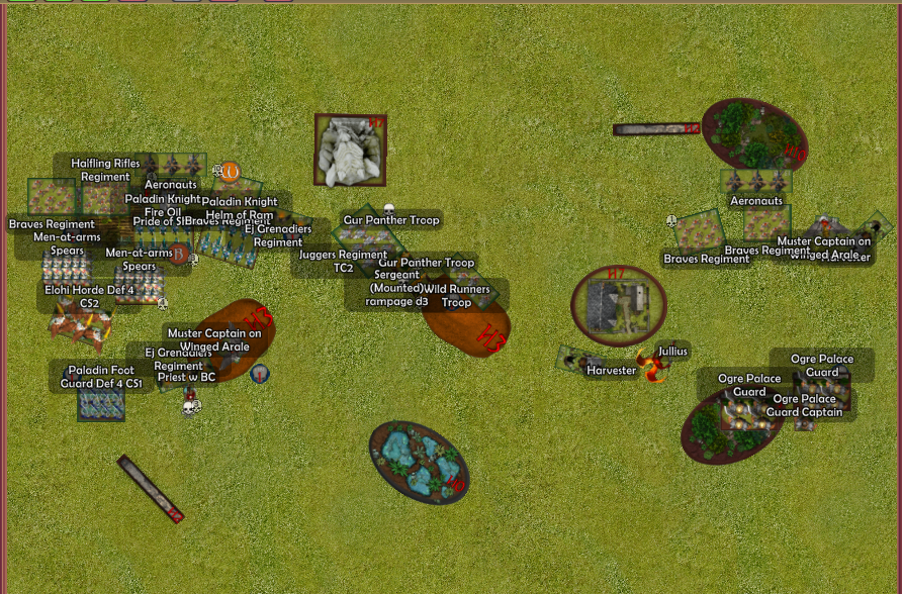
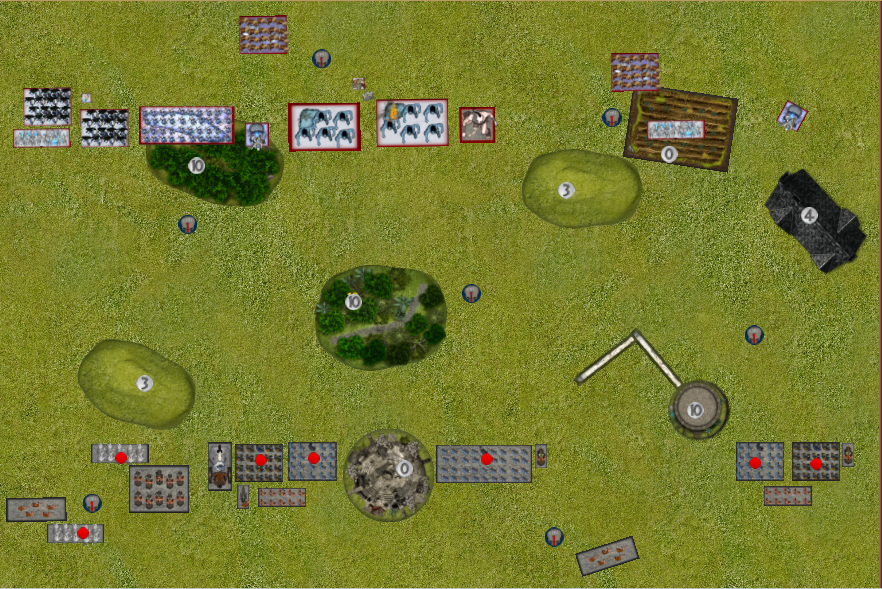
Dave: Well we seem to of spaced out tokens fairly evenly, I started placing units on the far left, placing 2 brave regiments, a rifle regiment and the pride of the shires to hold the line for me, I’ve placed my 2nd line of attack as all flyers to get the jump on Matt if he gives me a flank or leaves a back unit out in the open. My plan is to force matt up off his objective and swoop over to clean it up. I do however only need 1 of these 2 objectives if I can manage the far right objective.
I’m pretty happy with the far right deployment as well, provided I don’t get double charged by his 2 palace guard hordes I should win the right flank and claim this objective.
Matt: I’m playing around with what might be the best battlegroups in this list, happy to use the Elohi as an inspiring source also. I’ve tried to pile the majority of my US towards the majority of the tokens. I’ve gone for a mix of in front and behind with the gur, playing with what may work with them as chaff. One of the big weakness in this list is nothing to take off chaff and the enemy also has light shooting to eliminate my own.
The Battle Plans
Dave: Its quite simple, Crush Matt into the dirt….. or more specifically, I want to put pressure early to try and take all 3 objectives, I out drop him and want to use that to my advantage. If it looks like I wont be able to claim an objective, I’ll do my best to delay matt. If I can collect all 3, defend at least 1, I wont need to worry about the centre, and the more I defend the less I need to collect.
Matt: Take some risks. Let Dave win so he builds some confidence, learn some lessons. Move to next game then crush his dreams again.
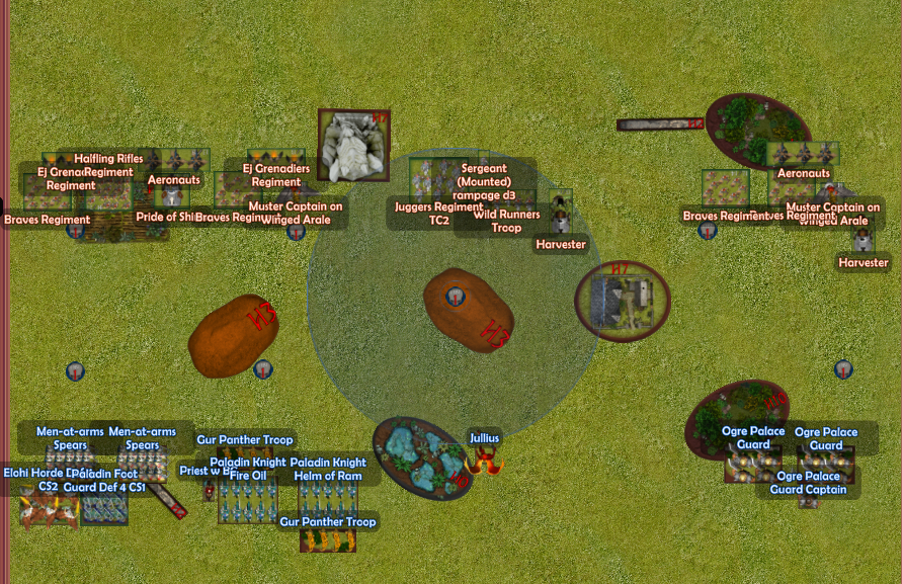
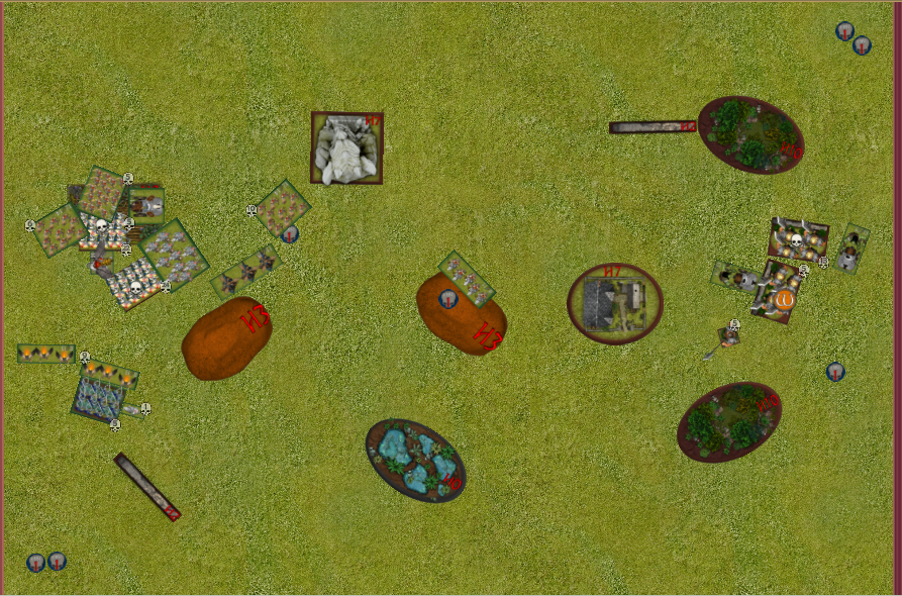
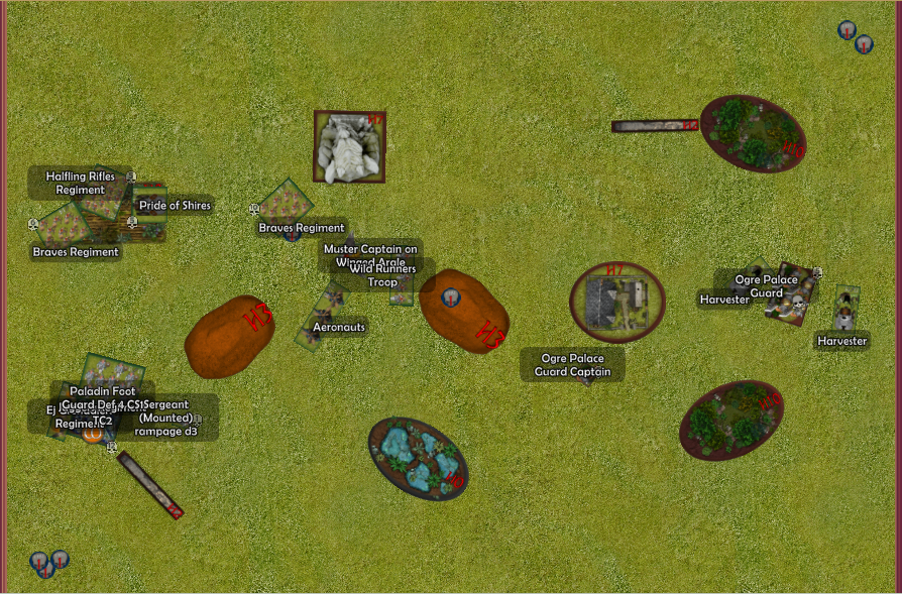
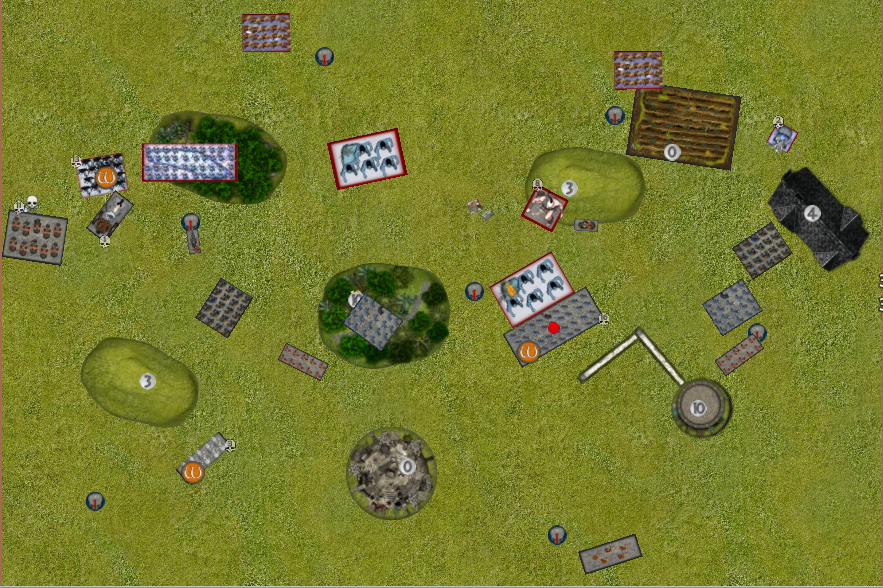
Dave Turn 1:
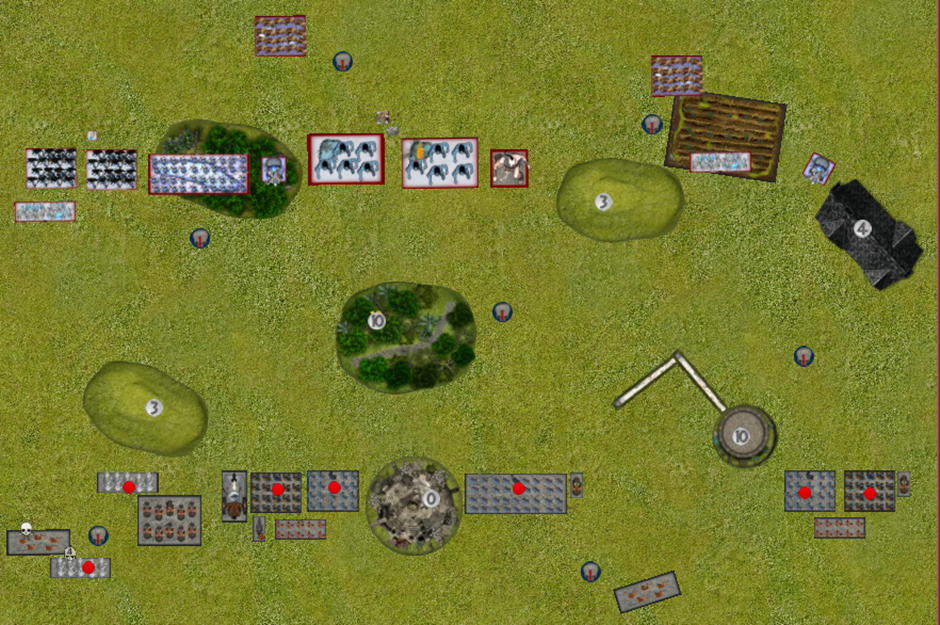
I just moved forward, nothing special. I’m cautious of any cheeky alpha strikes on my weaker back units from Matts flyers so I’ve bunched up, hopefully not to my detriment.
Matt Turn 1:
Dave has more scoring drops and much more manoeuvrability than myself so I have to be careful moving forward. Basically everything moves forward, I position the Elohi so they can’t be charged. Both gurs move forward limiting access to the knight regiments. Julius redeploys to help the ogres first.
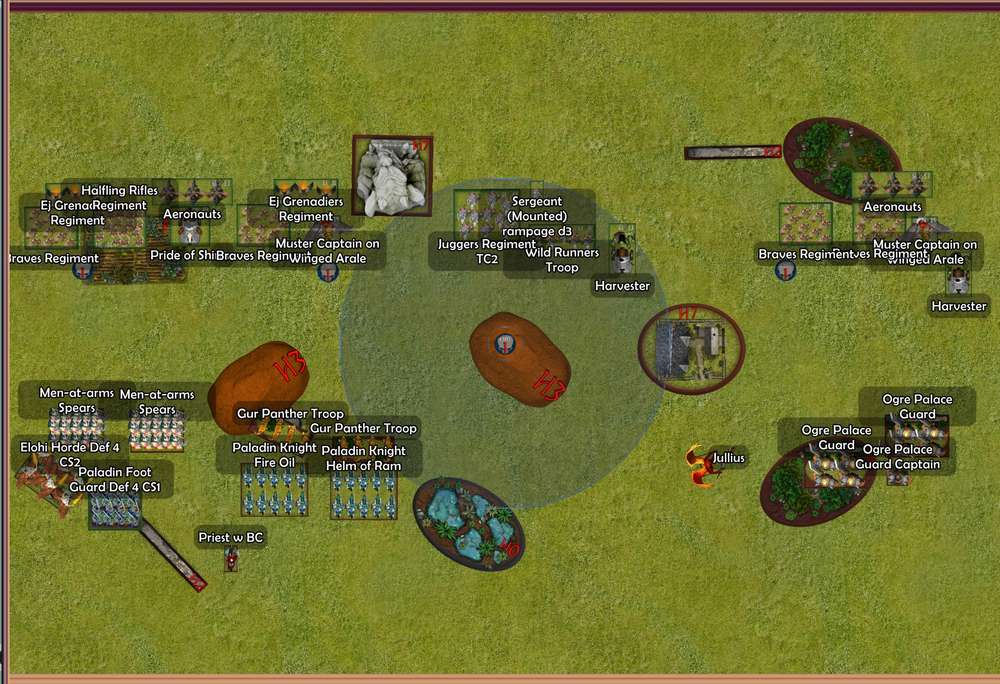
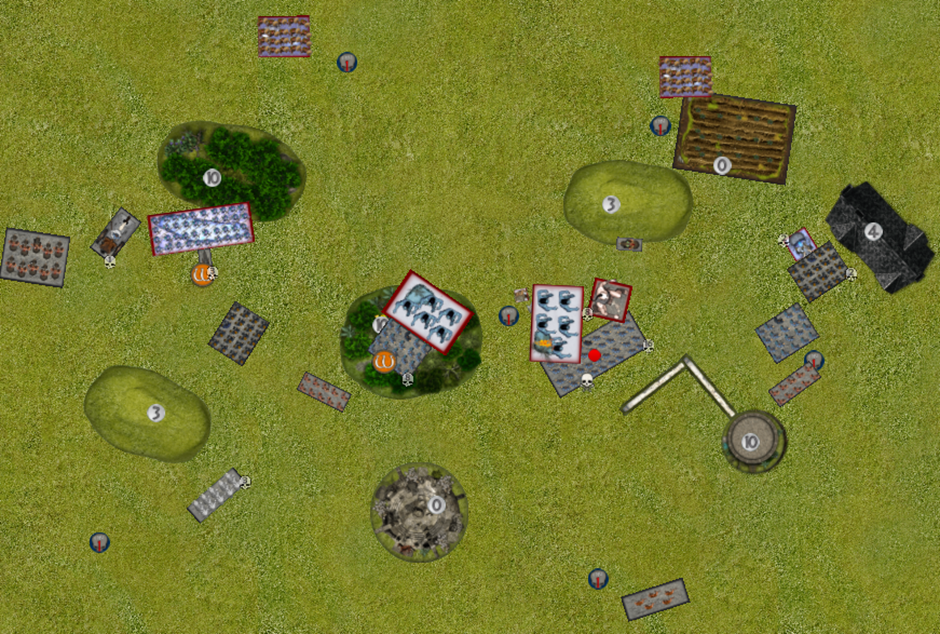
Dave Turn 2:
Ok this turn things get slightly more interesting, I feel like turn 2 and 3 is where this game will be won, so I need to work hard to out smart Matt.
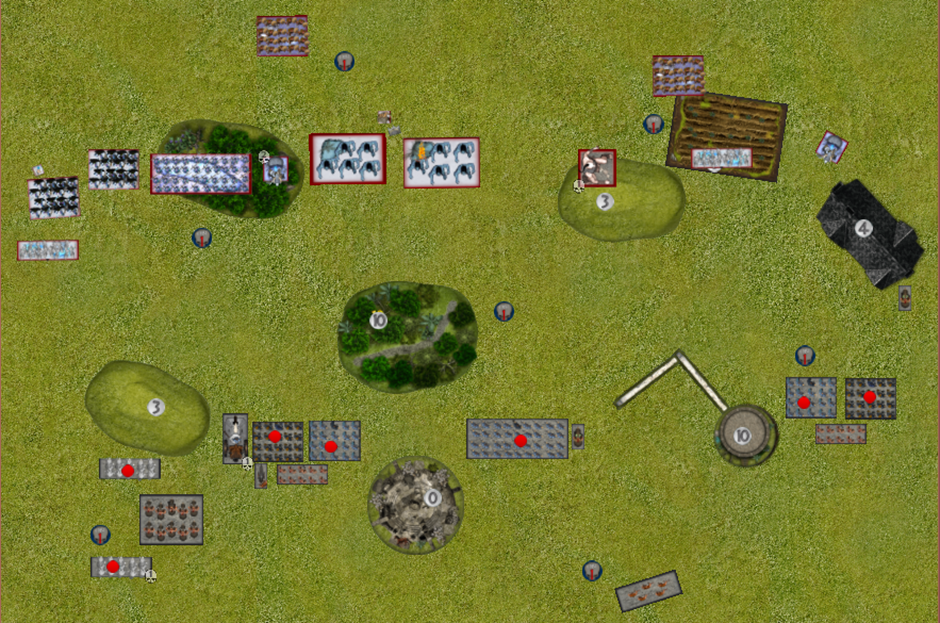
On the far left, I’ve just held my ground, I’m just out of charge range for his spears and his elohi only have 1 unhindered charge on me, my braves regiment, if he jumps on this, it could cause chaos for me, however it could also just throw away his horde. Although he has a flank on my winged muster captain he cant place it so its save for now.
I’ve got my 2nd rank in good supporting arcs to cover most of the moves I think he will make. So on the left flank I’m safe to just hold and shoot. I piled on 4 wounds to the spearmen but failed to break them with a 6 for nerve. (also they get one back from IR, so down to 3)
In the middle, I’ve moved my mounted sergeant out in front, my hope here is to get a charge and disorder his Cav, it wasn’t till after my turn that I realised he isn’t mighty and this could cost me and overrun charge, however if that happened I’d only loose my wild runner troop. I’ve left my self open to getting my winged muster captain chaffed up, however again I’ve got my 2nd rank of EJ grenadiers ready to charge past if needed. I believe most of my units are out of range of his paladin knights, so its really just gur panthers to worry about. I did manage to fire off a few wounds into one of the gur panther units, doing 2 wounds but missing the waiver by 1.
On the far right I’ve moved to give Matt only a limited amount of charges.
Jullius can only charge the front of the braves regiments, with the harvester and winged muster captain safe. Again only 1 ogre palace guard horde has a charge, and its on either my harvester or braves. This should free up some combo charges for me when my aeronaughts move into range. I’ve also snuck my other harvester up behind Jullius to put pressure on Matt to force a mistake. I intend to face the harvester back into the centre and take out a paladin knight regiment however I’ll use the perceived threat while I can.
I know this turn was a big one, but I wanted to spell out my plan before I turns to shit turn 4.
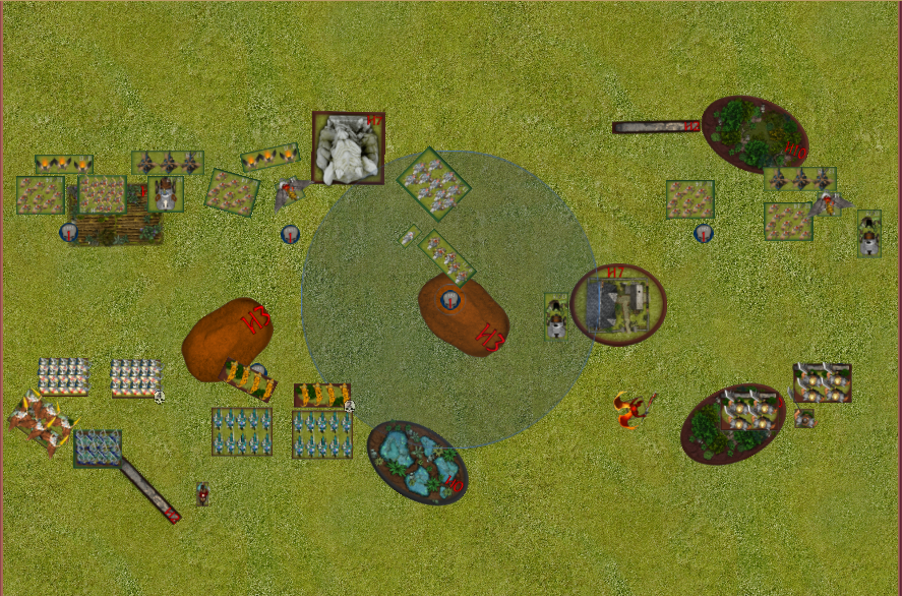
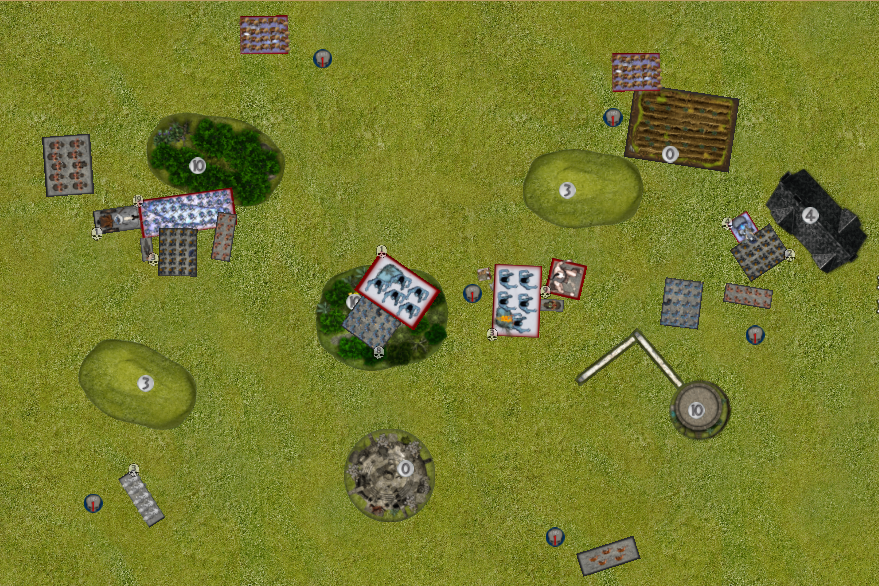
Matt Turn 2:
Here is the first of my YOLO moments. The mounted sergeant is out in front. In a tournament game this move would be ridiculous but I decided to double the gurs into the sergeant on the off chance they go through and then into units behind.
I know the knights won’t go through the Iron Beast but thought I’d have a crack and see what happens, then other knights go into the braves. On a reform they’ll be out of arc of the general. Surely they can take off braves right? Right???
The Elohi position so they still can’t be charged, Julius moves so the harvester can’t see him and other stuff moves forward.
In combat the bane chanted knights did 4 wounds on the beast and the braves were only wavered. Lol.
The gurs only did 1 wound, also lol. I didn’t realise he was def 5 but still it was a nothing charge. I expect that Dave is good enough from there to win the game from there.
Dave Turn 3:
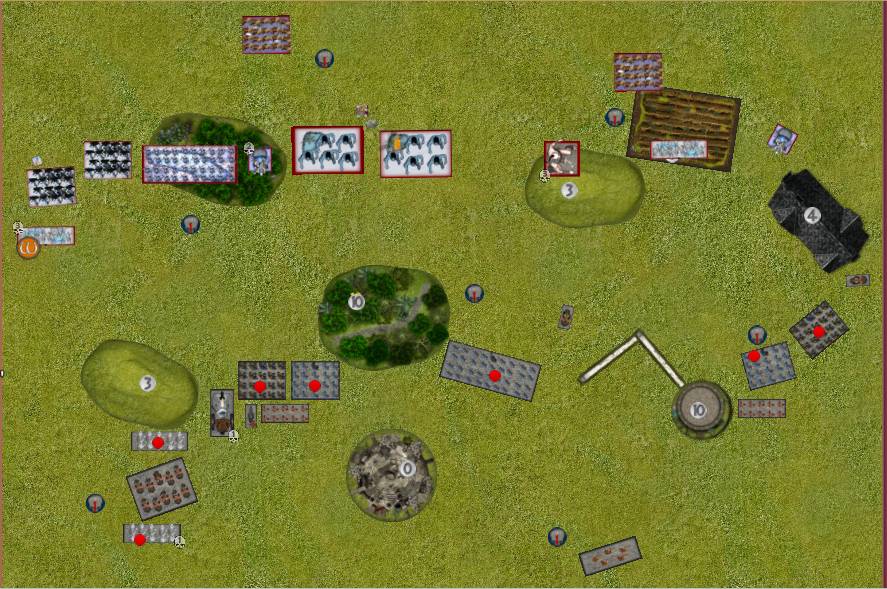
Well I made 1 mistake last turn, the positioning of my muster captain and Matt found it, I didn’t realise that if he double charged it would align in a way that it could block both my units with an over run and most importantly, strip TC from my juggers… lucky that gur panthers are weak as piss and didn’t come close to breaking my unstoppable sergeant.
I didn’t see the charges on my pride of the shire either, its height 5 head stuck out over the hill and made it an easy target. Countering Matts attack I took the chance to stick my flyer in his backfield and also got a cheeky charge on his priest. My EJs rolled hot to take him off and turned 180, now I have 2 units facing matts back line and he doesn’t have a charge on either of them, time to let the sandwich begin. My other EJ unit charged matts other knight unit, stripping its TC for the following turn, this should buy me time to send my juggers in next turn.
My Juggers made light work of his gur panthers, and the sergeant with the added rampage d3 took out the other.
Over on the right I’ve continued to sneak my harvester around to put more pressure on Matt, besides that, I’ve positioned to stop any multi charges and this should keep my captain or harvester alive from Jullius’ impending charge.
Matt Turn 3:
I decided to go in hard on the right and try and smash that side to my advantage. Julius went into the muster captain and the OPG into both braves.
Knights countered EJ’s and the Elohi went in as did some spears. My only option I think at this point is to go hard. I reface the other spears as he has got behind me. I didn’t look properly and didn’t realise the EJ’s were facing up too. Chuckle.
In combat. Both braves on the right died. Julius managed to waver the winged captain. The knights did 9 wounds on the EJ’s and the snaked them.
The hindered Elohi Did 6 wounds, which wasn’t enough and the rifles and iron beast were wavered.
Dave should be feeling pretty good right now
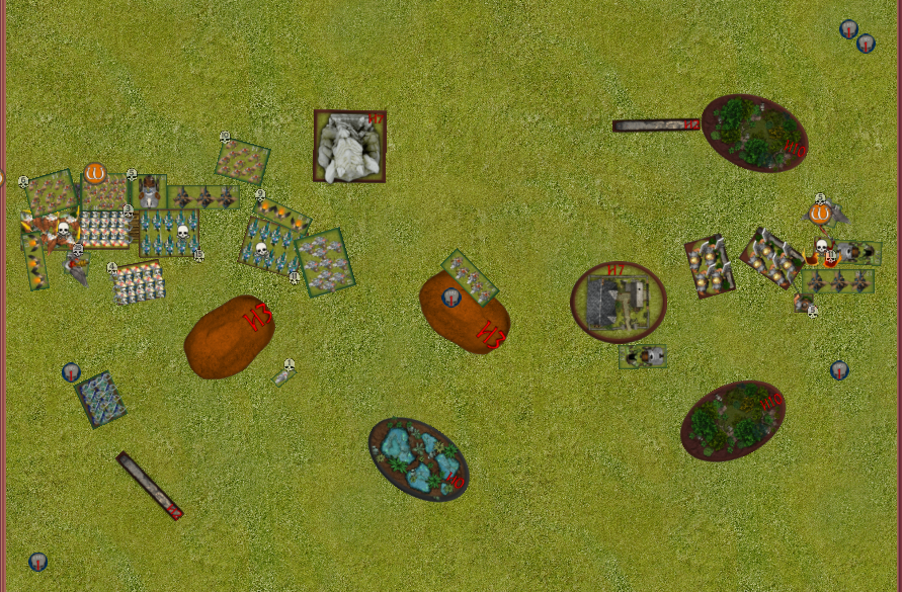
Dave Turn 4:
Just when you need a bit of luck, matt delievers, I fully expected the EJs to die this turn, however a lucky snake eyes sees my juggers slide in for the flank.
Again it wasn’t till the end of my turn that I noticed I had all my left flank lined up straight and that’s let matt put a charge on all my units.
My pride started waivered, but a pass on headstrong (headstrong aura on the pride has saved me so many times) now sees my pride and aeronaughts double charge to take off that unit aswell, so far so good for the halflings.
My rifles failed headstrong and stayed waivered, but the next combat over saw a triple charge remove the elohi horde.
If I’ve positioned well enough Matt should have no charges on the left flank now.
Over on the right I total mess up my movement last turn, I was so fixated on stopping double charges from ogres and Jullius that I somehow missed that his ogres were in range of my braves and it cost me a token.
My harvester in the flank of Julius sent him packing by stacking on 11 wounds. And my aeros jumped over to have a crack at his ogre captain, however rolled low and only did 5 wounds.
All in all a great turn, however that error on the right proved costly, now its 3 mistakes and matt found them all.
Matt Turn 4:
There’s pretty much no stopping anything from here. I can take some things out and hope Dave massively stuffs up somewhere. All i can do is repositioning and /i manage to take out the Aero’s and the muster captain
Dave: Turn 5:
Turn 5 started how turn 4 ended, brutally.
I multi charged the shit out of matt on the left to devastate both his spear regiments and take them off. And I’ve stuck enough US around my last objective to protect it.
I also charged his paladin foot knight with my sergeant and EJ’s for a waiver, however the EJ’s being US2 swamped the objective to claim US 4 to US 3, leveling the game at 2-2.
On the right my harvester went into the flank and took out an ogre palace guard horde and the other went into the front for the waiver. I managed the reposition with 1 harvester to hopefully claim my last objective next turn.
Matt Turn 5:
Unfortunately I’ve lost the image for this one but it’s essentially game over.
Dave Turn 6:
Well I’ve left matt with 4 units left so there isn’t many options I can take.
I charged my harvester on the right back into his ogre palace guard unit to go some more wounds and take it off.
I moved my other harvester down to collect the last objective
I charged my juggers who unfortunately were hindered this time into his last unit on the left, the paladin foot knights, I combo charged with an EJ regiment from the flank but managed a waiver.
Lastly I moved my Wild runner troop behind the hill but still within 3 inches, this means Matt has no LoS on it with his Ogre Captain and at best can only contest the objective.
I also turned and faced a few fast flyers in case we go 7 to take out Matts OPG captain.
So currently its 3-2 to me, with a potential for 4-2 if we get 7 but I think we will most likely wrap it up here.
Wrap up
Dave: My flyer game felt good, I was happy with my ability to hold Matts line while get behind him and pull some rear charges while remaining untouched.
I Made 3 key errors and matt jumped on all of them, I’m lucky that the gur panthers charge failed and I got some lucky waivers.
I was happy with the performance of the harvesters, yes they rolled red hot, however i was able to get them where i needed, i think placement in general worked well for me as i was able to execute a number of flanks and rears.
I’m also very happy with the mounted sergeant with rampage d3, the speed 8 nimble and h3 makes him great for chaff and mobile inspiring.
All in all suck it Matt.
Matt: I learned about the list in ways that I wanted and Dave did well to take advantage Of my mistakes. I’m going to do a bit of a rejig of the list to something I might find a bit more interesting.
Well it’s June and it’s the start of the Counter Charge Mantic Army Challenge. If you don’t know about the challenge listen to what we are doing by clicking here and downloading.
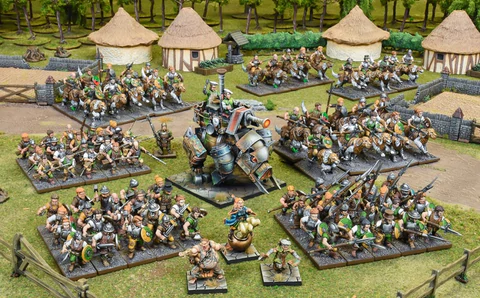
I have chosen to start getting the halflings going and what I am starting with is the Halfling Mega Army Box available from Mantic Games here.
For you regular listeners you will know that I am very lucky to have accessible child labour to do my assembling, so I have the whole box assembled and ready to go!
What I Like:
I really love the character of the halfling models. The faces are detailed enough to see expressions but not so detailed or small making them too difficult to paint. I really like that there are options for 3 of the four main infantry types, namely braves, spears and rifles.
I don’t mind the mixed sprue of cav and infantry although I do feel the split is slightly off for the current ruleset with the cavalry not being my first choice unit. However you never know how this may change with future rules updates.
I love the halfling iron beast. such a great model, mind came in a perfect single piece (reportedly related to the league of infamy kickstarter) and it has a lot of character with the two chefs on top. I’m looking forward to painting that one.
The characters. The sauceror, greedy guts, feast master and engineer are all cool.
What I dislike:
Not enough options to build your units in the majority one way. For example I would’ve loved half of the 60 to be braves but I can’t do that.
No mounted characters. With the amount of mounted options in the box I would’ve loved a mounted character option.
The thick terrain piece like attachment point on the cavalry. At this point it’s well known that a major drawing point is the visual appear of multibasing. Having the thick attachment pieces to go on the base is overall less appealing and requires some work around on your basing.
How am I going to about painting these bad boys and girls?
Well for starters I purchased myself the new speed paints complete set from army painter which I reckon is pretty good value. Check it out here
My main base colours are going to be:
Hive Dweller Purple for pants
Purple Alchemy (tends towards pink) for shirts
Dark Wood for wood
Hardened Leather for light armer and boots etc
Crusader Skin for skin
Fire giant orange for hair
I will then highlight up with vallejo paints with a quick highlight. Going on the model the purple alchemy does still have a lot of purple tone so it really needs the highlight to make it pink.
Below is a quick test which the quickshade paints made super easy to test with.
Bases I will be doing quite bare but using some resin multibase pieces. I’ll save that for a later blog!
With all this hobby talk going around I figured it was about time I ticketed off one of my long-time goals, blog a hobby project. So I figure I’ll aim for monthly update of how the project is coming along, what I’m working on and what I’ve managed to complete. It coincides really well with counter charge’s all mantic army challenge however I managed to start a little early, but lucky (or not for me) I have a bucket load of minis to paint.
You can check out the hobby challenge on the Counter Charge Facebook page.
Since really falling in love with kings, I’ve been wanted to do an all-mantic army and when I first heard mantic were releasing halflings I knew I was all in.
( actual footage of me, when i saw mantic’s halfling release)
So what’s my plan?
I’m running with the rule of 2, which is buy 2 boxes of everything. And I’ve come close to that.
I want options once my army is complete so I’m looking for around 3000pts before I’m calling it done. I’ve been testing pretty heavily with Matt Croger and some other friends over UB2 and I think I’ll go with the following options to start
– 5 regiments of braves/spikes ( I’ve modelled up more spears then hand weapons as I like the spear look, however I’ll most likely run them all as braves)
– 2 Rifle regiments
– 2 jugger regiments
– 2 wild runner troops (although I have millions of spare cav, so think might turn into 2 regiments as well)
– 4 troops of stalwarts
– 2 aeronaught regiments
– 2 EJ Grenadier regiments
– 2 Generals on winged aralez
– 2 volley guns (But I’ve magnetised the base to swap between howitzer and volley gun barrel)
– Mounted sauceror
– Sauceror on foot
– Muster captain on aralez
– Sargent with the banner of hodenburg
– Iron beast
– Harvester
So no short order…. See what I did there…
So what theme am I going with? Well from seeing all the release material from mantic, I really love the rolling hills, green fields and cobble stone roads. I’m attempting a kind of shire defense theme, where the halfling villages are being mustered to defend there homeland.
As for colour, I’m going for a red/yellow/brown mix, I want my pop colour to be red and I want the rest to compliment. I spend a bit of time staring at the old empire states colours and originally wanted to go for an aldorf theme or hochland, however one theme would make the army look like Santa’s helpers and well, I painted enough blue on my last army so I needed a rest. Now that I have completed some units I do get a very Gryffindor vibe from it however
1. I’m a massive harry potter fan so it work for me
2. I feel the colours really compliment each other well and the minis aren’t lost amongst the basing.
So where am I at?
Well I’ve managed 3 regiments of braves so far, I’ve based the spears so they can form up into a horde if I need.
I’ve finished 1 troop of wild runners – I’ve tried to make it look like my cav are charging down rolling hills, and this troop was my test piece for it. The pre-moulded base on the bottom of the aralez feet is going to be a challenge for me. I’ve managed to clip them as short as possible and use strategic tufting to hide what I couldn’t.
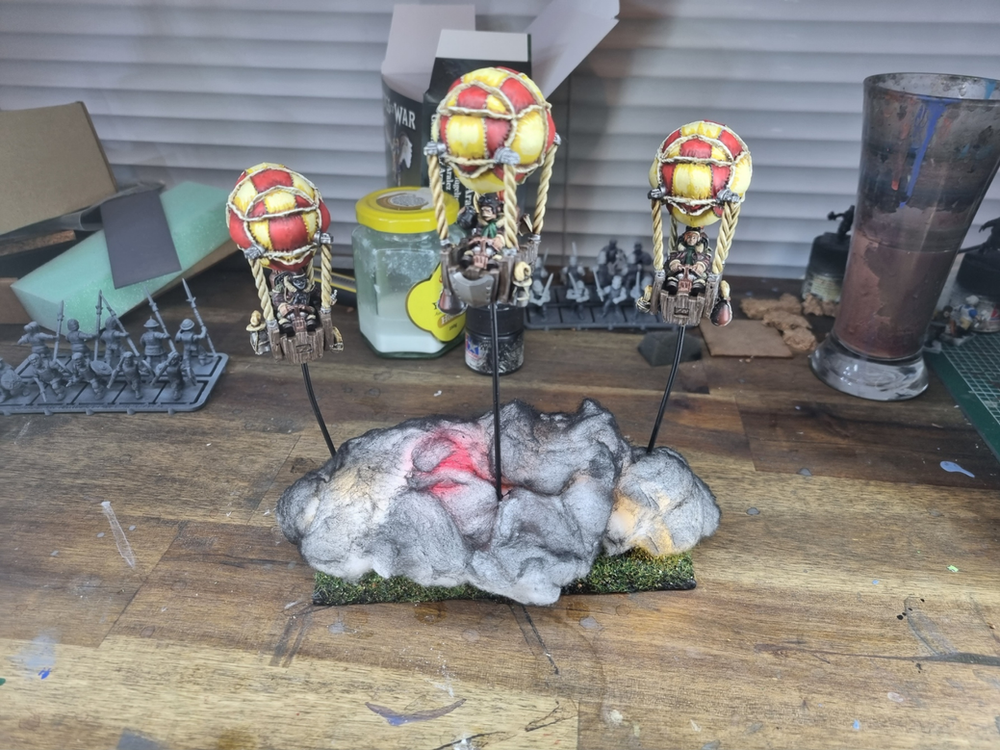
Lastly I had a bit of fun with flicker LED’s and went for a bombing run feel for my aeronaughts
Next up is my banner of Hodenburg, its my only non-mantic model in the army as mantic haven’t made a standard bearer (yet…. There is still time Ronnie!), I’m also working on one of the volley guns, and engineer.
I’ve got plenty built, primed and ready to go, so I’ll most likely work on some spears again after these are done, and start on some more bases.
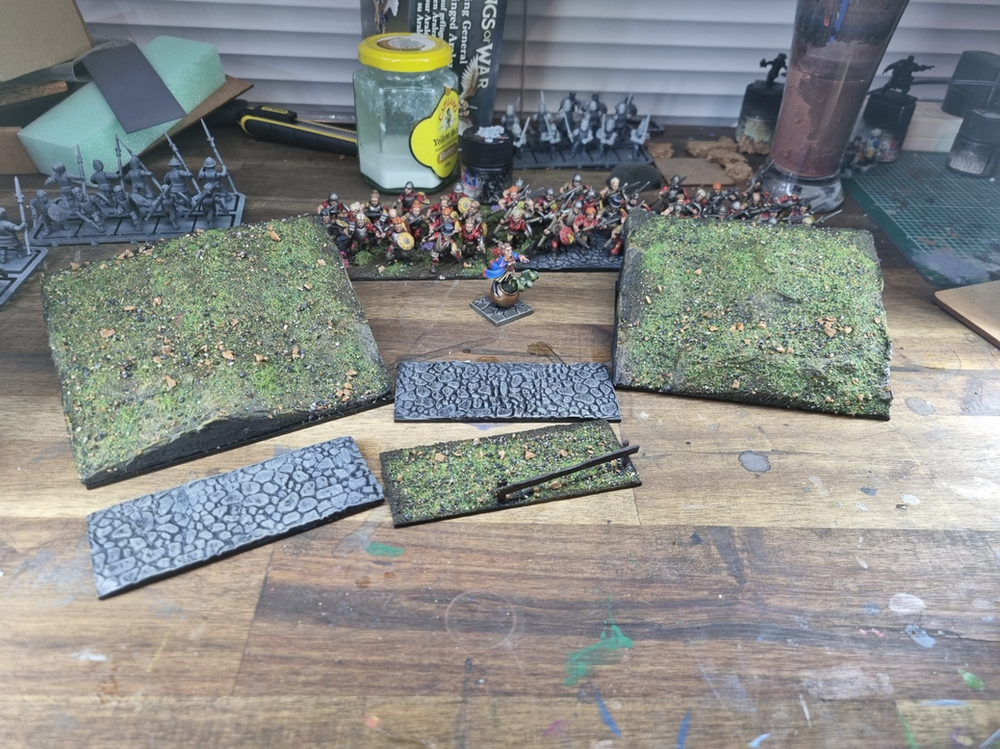
Here is a pic of my jugger bases, however I’ll most likely add some trees and potentially a fence in the lower half of one
(not really sure why I based up some troops? maybe I was testing something… I might use these for rifles if I have spare minis.
I’ll check back in July to see how I’m going, as for now I look forward to seeing what you are all working on,
Dave: This is almost the same as last time, I dropped mindfog on my ice queen and picked up blizzard and the EJ periscope, to free up the points i dropped the hammer of measured force on my ice naiad horde. This list should give me a little more range to pick off matts back units.
Matt: I’m running my same dwarf list from the last couple of reports. Dave insisted on trying his newer version against the same list so I was happy to line him up for a spanking again.
Deployment
Matt: When placing the tokens I first tried to have two in opposite deployment zones where I would want my sharpshooters so they could just sit on a token the whole game. This would allow this no matter which side I got. My first two drops were about controlling the back token and the token off to the left. When I saw Dave drop his two dwarf units in the backfield I was quite happy as I felt I had more US scoring redundancy than he did. I then deployed heavy center and left to protect those two tokens and just enough US to counter his frost fang for the right hand token. At the end I was pretty happy with my deployment.
Dave: I did my best to counter deploy to Matt’s force, I wanted my Ice kin to have shots at lower def stuff, and I wanted my Ice queen with blizzard to be able to back them up.
Again I went Naiads in the trees near an objective, and I plonked two dwarf regiments back on objectives to just hold them all game. (maybe sticking a snow fox on the back one could have been beneficial? But oh well).
I was happy with Hrimm and the trolls controlling the center, and my frost fangs on the edges to project some threat at Matt and stop him creeping up
My plan :
Ok so this time I need to do the following.
– Use terrain to my advantage, there is a big blocking piece in the middle and I need to use it to protect myself from throwing dogs and sharp shooter pot shots where I can.
– Aim to hold all three of my objectives, claim the center and annoy Matts back objectives to stop him from pushing up slowly.
– Not get throwing dogged into next week…. Last game I lost 8US in the 1 turn and it was mainly to dogs, If I can limit what dogs get chucked and if I can kill his dog throwing dogs before they can do damage I’ll be happy.
Dave 1
After last games over commit early I decided to hold my ground, If I can hold all of my 3 objectives and run the centre turn 5 and 6 I’ll still likely pull the win, so I decided to move my queen into range and blizzard the back sharp shooter troop…
I pull in 4 wounds and broke them easily… first blood to me, suck it Matt.
Matt 1
Losing those sharpshooters turn 1 was a blow that I didn’t quite expect, so I became determined to hide the US behind the hill to protect the left hand token. This involved some shuffling sideways. The rest of the units push forward in order to start to threaten.
In shooting I held on to my mastiffs for now even though I know Dave would love some slobbering pups to the face. Golly have did two wounds to the left frosty and the sharpies did 1 to Hrimm Job. I chose the frosty and Hrimm as I wanted to avoid regen targets and I like spreads out some early hurt to let my low CS guys have a chance of breaking later in the game.
Dave 2
I tried to continue my luck running into turn 2, I fired into the mastiff pack looking to do similar damage. If I could take them off I’d force matt to leave another scoring unit back capping the objective and force him not to over commit his force, however I only managed 1 wound and failed to break them.
I turned Hrimm and headed toward the right side of the field, as I felt a a little exposed with only a Lord on frost fang defending that edge. My lord is doing a good job projecting threat and stopping Matt’s forces from creeping up too far however I need more then just it to hold the line.
The center again just stayed there and waiting. Now for some reason I decided to leave my FFL in the forest…. I set out thinking to use terrain to my advantage… and I keep hear that a lot… but what people mean when they say “use terrain” is use terrain the block LOS, not just give cover. If I had of left it on the back side of the woods for 2 turns i’d be a few more wounds better off and could of just moved it in turn 3 and be in the same spot, and considering I have no intentions of shooting
Matt 2
A little more dancing on the bottom left. I manoeuvred the brock riders to cover the left if the foxes rushed forward. The centre contnued a slow press forward whilst staying out of range of important charges. The right manoeuvred to be controlling the right token whilst online giving the Frost Lord bad charges.
Shooting Golloch oh did a couple of wounds on the foxes and wavered them whilst the sharpshooters did 2 more wounds to Hrimm Job.
Dave 3
Well I forgot to get the screen shot of turn 3 and I cant for the life of me remember what I did. But it was probably just a display of tactical genius on my behalf.
Edit – looking at turn 4, it seam I shot my queen into his back mastiff pack and managed a waiver on it.
Matt 3
We had a double bugger up on screenshots here sorry
Bloody ice queen with blizzard has been a pain in my butt all game taking targeting my poor mastiffs.
Not much of other value happened other than a couple of dogs were put into the left frostfang causing three more wounds.
Dave 4
Shooting wise, I use my queen to finish off the back mastiffs with blizzard again, and peppered some wounds onto the forward mastiff unit with my icekin hunters. If I can take them out, I’ll force matt to keep a big ticket unit like his berserker broc riders back to cap his objective.
I’ve turn and positioned my trolls in the centre to cover if matt tries to pivot and support the centre.
Meanwhile I’ve used my lord on frost fang to chaff his shield breakers while I get ready for a double charge from trolls and hrimm. Not sure it’s the smartest play but with 5 wounds already I figure I’m best getting the first charge in as that shield breaker horde will take him off in 1 turn.
Its starting to feel like this could go 4-3 to me, maybe even 4-2 if I can snipe off another back unit of Matts
Matt 4
Ok the Ice queen has forced me to really protect that last unit of mastiffs.
Golloch and his wild charge allowed me to get into the ice kin hunters. I’m not fussed about naiads in the flank if I don’t pop them. The brocks moved forward to take out the foxes. The shielbreakers counter the frostfang and all the other units move to keep threatening objectives late game.
In shooting i get a couple more wounds on Hrimm.
Combat. The bricks take out the foxes and reform to try and force the ice queen to not be able to go around the outside due to the one inch rule, but i don’t think that will work. Golloch only does 5 wounds on the IK Hunters and fails to pop them.
The shieldbreakers rip off the frosty’s head.
At this point in time I am confident in getting the top left token, the bottom with my sharpies, the far right token and I still have plenty of US to move towards the middle. If Dave doesn’t take the mastiffs off with blizzard I’ll get bottom right too. It will be tight but I’m certainly in a position to win.
Dave 5
I didn’t expect that charge from golloch so my waivered Ice kin have just withdrawn and turn to slightly better themselves for a charge from the berserker brock riders.
My ice queen just failed to break the last mastiff hunting pack which I feel will be very costly for me, They are waivered, but will be out of LOS next turn.
For some reason I did nothing with my ice naiads, as taking the flank on golloch was probably a great idea and instead I did nothing and now I wait for a multi charge, I didn’t even move out of arc of golloch…. total brain snap.
My trolls munched into the shield breakers but I pulled yet another waiver, however I want them holding the middle objective so its not a total bust for me.
Hrimm has turned to face the centre and munch up any dwarves that try to cross the centre forest.
And the dance continues on the right, I’m kinda happy that 2 units have held the objective, even if we just sit out the whole game I’ve invested a little over 315pts to secure my objective which I feel is ok value.
From here I think I’ll need turn 7.
Missing that back mastiff pack hurt, so its 3 to matt, 4 to me and I feel comfortable enough on the centre, however like last game I feel my ice naiads won’t hold up to multi charges and matt is lurking with a few of his units to flank it.
So I need a way to take one of his last two. The waiver on the shield breakers hurt me here but cause I need them further down the board, either taking on the sharp shooters if I get a decent over run next turn or into the ironclad or berserkers if not.
Matt 5
I think Dave made a mistake by not moving his Ice Queen out of arc before trying to take off the mastiffs. Now I should be able to kill it and that leaves me with the bottom left token for sure. So all of a sudden the centre token doesn’t bother me, as I position to take the top left I will have the other bottom three, giving me a minimum of 4-3.
Golloch charges the ice kin and the brocks charge the ice queen. All other units reposition. The shield breakers fail their headstrong roll. I pop the brock lord out finally to threaten Hrimm, he won’t need a lot more damage to be at risk.
Shooting the sharpies fail to do anything.Two throwing mastiffs from the far right units do two wounds on the FF Lord.
In combat it’s goodnight ice queen and IK Hunters, allow me to reposition to likely smash the naiads next turn.
Dave 6
Well the left went a little different then expected, without my ice queen I now have no long range tools to force another check on his mastiff pack, I took the charge on the battle driller to try and get out of arc from the berserker broc riders and golloch, but unfortunately I get another waiver.
In the centre, my trolls pull another waiver (come on, this is like 5 for the game now) to hold up the ironclad and stop them from contesting the centre objective.
I charged Hrimm into the shield breakers with the trolls mainly for the reface, and now needing turn 7 should have a decent shot at cracking the right objective.
And on the far right, I charged my lord on frost fang into the ironguard, mainly just to stop any funny business from them, Matts army is all height 2 here and my lord at height 4 cant do any cheeky corkscrew manoeuvres.
Matt 6
Big multi charge on the naiads giving me a likely kill there. The berserkers were able to reach thanks to wild charge. I abandoned the pretence on the middle objective and position the right units to block the right token without a big over run. The brock lord went into the trolls to stop them contesting the right
Shooting. The sharpies did one wound on .
In combat the naiads died. A couple of wounds went on the frost and a few on the trolls. I’m pretty comfortable I’ll win here even in 7.
Dave 7
Well, its all on the wire now, matts movement game is on point today. I have 1 chance to win this now.
Here is the play, I double charge the iron clad… done
I pile on 9 wound….. done
I roll 17 for nerve….. they are gone
I roll a 4+ for the over run to claim the lower objective and win the game….. and I roll a 1…
GG Matt well played
Wrap-Up
Dave: I wanna first start by taking the positives from this game.
– I made turn 7, that’s 3 better then the last time I face this list
– I was happy with deployment, yes I could of done things a little better ( lord on frost fang behind the forest) however I can take that knowledge into more games now
– I feel I finally understand the “Use terrain” catch phrase people always throw around.
– I didn’t leave myself open for a massive volley of throwing dogs, in fact I was able to kill 2 units before they used them.
Where could I of gone better? Well I think I need to be a little smarter then just expecting the ice naiads to just sit there and hold an objective. I need to find ways to support them further, perhaps use my ice kin a little smarter.
I feel I let myself down with chaff this game, as they really didn’t make an impact on the game and I’m not totally sure how they could of, perhaps if there were alive enough to trap the berserker brock riders.
Final thoughts on the list:
Blizzard is a much more useful spell then Mindfog, so I’m happy with the change from last game. I think considering what I have painted, this is about as good as I’ll get prior to shirecon in July. So it looks like I’m taking this list at this stage, unless I totally flip out and find a way to make sylvan kin work…. Which I doubt.
Matt: Dave pushed me to the line this game. I made a mistake by having my sharpshooters on the left uninspired and too far forward during deployment they would have been useful throughout the game. Dave magically charged over my effectively mighty brock lord turn 7 but I won’t hold that against him haha.
Hey Dave here, I’m a bit of a rookie when it comes to kings, so I have been doing some bat reps with Matt Croger to help me develop my game. Going into clash of kings Australia I think I had less then 15 games of kings total, but since meeting a few people I’ve managed to get a heap of UB in and thought It might be worth blogging out a few big take aways from what I’ve learn so far –
Get past the idea that you need to kill everything
Unit strength matters a lot, and when i shifted my focus away from taking charges to kill stuff and looked more at making sure my main units (and coincidently a lot of my US) were where I needed them for late game I started fairing a lot better, I think perhaps a nice coincidence of be playing a halfling list with not a lot of hitting power has made me focus even further on my positioning and less on killing Matt’s armies
You can’t charge what you can’t place
This carries on from my last point, positioning is everything in this game, and the wizards of KoW have it down to a fine art. Angling units to protect flanks, or prevent facings is just such an pivotal part of the game. PBE (play by email, is a correspondence way of playing kings) is awesome in the fact that you have all the time in the world for your turn, and with a few clicks you can see what’s in arc and what’s out…. I haven’t had too many in person games since January, so going into a tournament in July we will see if the last few months has made me sharper or softer when it comes to seeing angles and arcs.
Do the math, or get a wound calculator
Initially in KoW I made a lot of silly charges, over estimating how much damage I expect units to do or what I thought I unit could hold up against (and sometime still do). I started using a wound calculator to give me the average result and its helped shift my focus on what’s realistic when it comes to game state, for example, how many turns I think my units will take to break a unit, or how long a unit of mine will last before its gone, and what can I move to make the next few turns more favourable for me.
Use terrain – I need to get better at this, but really I needed to understand what people were saying.
So its one of my more recent developments, I kept hearing “use terrain” and I’m thinking, “I’ve got all my guys just sitting in the forest, I cant fit any more in I don’t know what your talking about”, or “I’m on this hill, I’m ready to charge. What else could you mean?” well it turns out they meant block LOS with terrain….
So yeah, when you read ‘use terrain’ they mean, ‘block LOS with terrain, and force hindered charges with terrain’ and considering one of the first rules of KoW is you cant charge what you cant see, using terrain to block LOS goes a long way to increasing a units survivability into late game until you really need it.
Good players limit their opponent’s options to bad ones.
As games flow on, you and your opponent both have a series of decisions to make in an attempt to execute your game plans. The really good opponents (and I mean better then Matt) limit their options to bad ones, and before you know it you’re cooked. Its stuff like little positional changes, or keeping units just projecting threat in the middle, but also moving up 2 or so units in a pair so you cant really charge it without opening up a flank or corkscrew. It’s the kinda stuff you can’t really stop and it is shutting down your options slowly, so before you know it, you can just sit and be charged or take the unfavorable charge and either option sucks.
(also, if anyone has some hot tips for defending against this please let me know)
Try and think a turn ahead.
This kinda piggybacks from the last point, PBE is awesome in that you have all the time in the world for you turn. You can think about your move options, (get smart with a wound calculator and have a think about what units will still be alive) and then start to think about what your opponent will do, and how you can best apply pressure to get the best game state. Quiet often I’ve run through just about every scenario I can in my head to see what outcome will make the next turn more favorable for me. If you can get in your opponents head and try and predict where they will go next (think back to limiting their options) you can take your game to the next level. The biggest challenge I’ll face with this is taking it to the table top. I’m sure I’ll clock out turn 2 if I try and big brain my games to this level.
Some armies are more forgiving.
I don’t think this is ground breaking science here, but some armies really do seem (to me anyways) more forgiving then others, and too that fact, I don’t know why I am drawn to the finesse armies that need to be wielded like a scalpel not a hammer? I’m sure it’s a matter of some armies simply having more options, or maybe I just seem to get really bad match ups? As much as I really enjoy the idea of sylvan kin, and halflings, I really haven’t mastered at all how to best use them with the precision they require, especially against higher def armies.
But the real bonus of UB here is the opportunity for variety you have at your disposal. You can sub in what ever units, or armies you want to mix and match and play around to try and find your sweet spot, I know I have a lot more work to go in this department, however so far I’ve worked through nearly every unit in the halfling list so I can focus on building what I enjoy playing with before I spend the time and effort hobbying away for many months.
PBE is a slippery slope (the importance of sustainable gaming)
I think this is probably the trap I get myself into. There is no limit to how many games you can have on the go at once, you can test lists all day long. There is a price to pay with this however, and for me its my ability to actually concentrate on what I’m doing and focus on my plans. I remember one night, where I deployed three different games at the same time, (just had multiple browsers open) and tested out my list again three opponents, It was a nightmare… I couldn’t remember each list to the detail I need when trying to be competitive, I rushed myself into getting all three turns in a night to keep the game flowing and in the end I was just moving units and getting crushed with no real chance of ever winning. In the end I think I only made turn 6 in one of the games and I didn’t really give my opponents the challenge they deserved. However I did learn one important thing about myself. I really don’t perform under pressure and I need time to focus on my game plan, my opponents list and the board state to really stand a chance of winning.
I know some people out there are true wizards of cognitive ability and can switch on and off between games but I am not. As soon as I get more then one game on the go my concentration rapidly declines and so does my enjoyment, I only get so much free time for hobby a week so Its important that I enjoy it all, so a little UB and a little hobby for me is the right mix.
Anyways that’s all I have, thanks heaps if you have read this far. A lot of the reason I’m doing all these is it helps learn and get better, so on that If you have any feedback, or you think you have the silver bullet I really need to crush Matt in our next game please let me know I’d love you hear from you.